Setting Up a Waves Platorm Full Node on Digital Ocean
Youtube tutorial
Secure your waves Node
Updated Tutorial
==Steps==
*Note you may need to use sudo , This tutorial can be used for steps , We recommend to follow
latest procedure from waves documentaton
Step 1
Update all packages to the latest one.
Command:
sudo apt update
Step 2
Add extra functonality and sofware to Ubuntu (it could already be i nstalled on some occasions)
sudo apt install -y sofware-propertes-common
sudo apt install -y build-essental
sudo apt install -y nano
Step 3
Install Java development kit (I use openjdk but this one is recommended).
sudo add-apt-repository -y ppa:webupd8team/java
sudo apt update
sudo apt -y install oracle-java8-installer
Check if you have the l atest version
java –version
Step 4
Download the latest fullnode from Waves repository.
Link: htps://github.com/wavesplatorm/Waves /releases/
Command: [Look for latest version]
wget htps://github.com/wavesplatorm/Waves/releases/download/v0.15.4/waves_0.15.4_all.deb
Step 5
Install the downloaded .deb file:
sudo dpkg -i waves_0.15.4_all.deb
Step 6
Create a new Waves wallet either on;
htps://waveswallet.io/ (contains encoded base 58 seed)
or
htps://wavesplatorm.com/ (does not contain encoded base58 seed) You can encode your seed
yourself by using a bas e58 encode tool.
Store credentals of your new wallet in a safe place.
Step 7
Open the Waves config file with an editor like nano or vim (usually
/usr/share/waves/conf/waves.conf)
Command:
sudo nano /usr/share/waves/conf/waves.conf
Step 8
Configure waves.conf
Remove the comment from node name by deletng the #
Example:
# Node name to send during handshake. Comment this string out to set random node name.
node-name = “Some Unique Name”
Set the declared address to the external IP address of your node:
Example:
# String with IP address and port to send as external address during handshake. Could be set automatcally if
uPnP is enabled.
declared-address = “200.200.200.200:6969”
Set your wallet setngs (set a local password and use the base58 string of your wallet.
# Wallet setngs
wallet {
# Password to protect wallet file
password = “FILL_IN_LOCAL_PASSWORD_HERE”
# Wallet seed as BASE58 string
seed = “yourbase58stringofyourwallethere_thisis_a_very_long_string”
}
Set your node REST API.
Change “enable = no” to “enable = yes”
Set bind address to your IP (this could also be your internal IP if you’re not connectng from the
outside)
Example:
# Node’s REST API setngs
rest-api {
# Enable/disable node’s REST API
enable = yes
# Network address to bind to
bind-address = “200.200.200.200”
# Port to listen to REST API requests
port = 6869
# Hash of API key string
api-key-hash = “API KEY HASH HERE”
}
Set features you wish to support by votng for it (if there’s a vote ongoing).
features {
supported = [4, 5, 6, 8] }
Step 9
Make sure the Waves node starts automically as the server boots
systemctl enable waves.service
Start the Waves node
service waves start
Watch the Wavesnode log live (press ctrl+c to cancel)
journalctl -u waves.service -f
The Waves node is now downloading the blockchain. This process could take quite some tme.
Once you see the Blockheight is the same as on htps://wavesexplorer.com/ you are fully s ynced.
Check if your node is s howing up at (use ctrl+f to find your IP)
htp://dev.pywaves.org/nodes/
Step 10
Set api-key-hash. The password is the password you used in # Wallet setngs. You can replace
‘localhost’ with your IP if the command is not working.
You can find your API key hash by issueing the following command:
curl -X POST –header ‘Content-Type: applicaton/json’ –header ‘Accept: applicaton/json’ -d
‘YOURPASSWORDHERE’ ‘htp://localhost:6869/utls/hash/secure’
Open waves config and set API key hash:
sudo nano /user/share/waves/conf/waves.conf
# Hash of API key string
api-key-hash = “API KEY HASH HERE”
}
Restart Waves node:
service waves restart
DONE! Your Waves Platorm full node is up and running. I you want to beter security for your
node I encourage reading:
htps://medium.com/wavesgo-educatonfund/how-to-configure-your-server-for-a-secure-waves-node-58558b
Startng, restartng, stopping or get the status of the node:
sudo service waves start
sudo service waves restart
sudo service waves stop
sudo service waves status
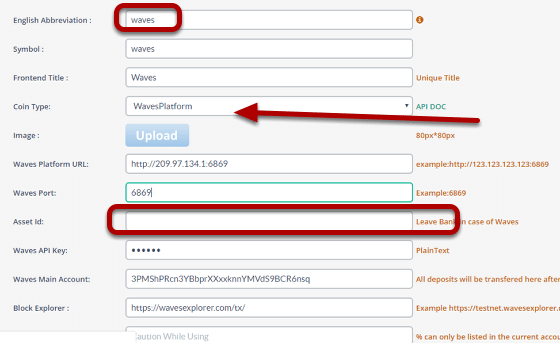
It is necessary to configure Waves coin before its assets
Make sure you save waves coin name as waves
This is very Important, Do not save it with other name, else assets would not work.
Waves Platorm URL is complete URL where API’s are accessible
Waves Port is Port used for Waves Platorm URL
Asset Id Leave blank for waves coin [Do not fill any thing]
Waves API Key is plaintext api key defined in above tutorial
Waves Main Account is Main account where you want all funds to be moved, afer depos it. Afer
each deposit the fund is moved this account , and later when there are withdrawal requests , its
also moved from same account.
Block Explorer :htps://wavesexplorer.com/tx/ or htps://testnet.wavesexplorer.com/tx/
[[Remeber you should Hold Access to Main Account Access or all your Funds will be lost, Dont enter a
wrong address]]
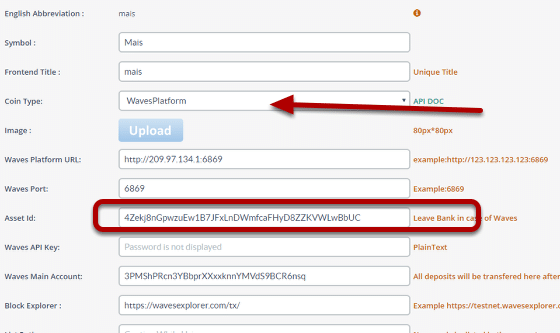
When you Configure any asset id make sure you give it a proper name and Cointype is
WavesPlatorm
Waves Platorm URL Keep Exactly same like Waves
Waves Port Keep Exactly same like Waves
Asset Id Enter Correct Waves As setd Please refer below for more info
Waves API Key Keep Exactly same like Waves
Waves Main Account Keep Exactly same like Waves
Block Explorer :Keep Exactly same like Waves
Assetd
On WavesPlatorm each asset is given unique asset id, This is you should know and confirm
before entering .
Till date there are 22k assets , You can confirm it from Google or check here
htp://dev.pywaves.org/assets/
[[Remeber you should Hold Access to Main Account Access or all your Funds will be lost, Dont enter a
wrong address] ]
Leave a Reply